Tuesday, June 19, 2012

Spirit Wear Necklace


Showing your school spirit is huge around here.

I thought it would be fun to make spirit wear necklaces for all the moms on my son's all-star team.

I actually did this craft with my son's 5th grade class for Christmas except we made the bottle caps into magnets instead of necklaces.

I saw another mom at the park with a similar necklace which got my creative juices flowing.

I already had the bottle caps left over along with the stick-on to go over top.  Hubby was the one who created the paw print insert, I just had him go back and add each players number to it.

My son and I worked on these and I love how they turned out.  The moms all loved them.

So, here's how we did it.


I gathered some of my extra plain bottle caps.


I had hubby create the inserts with each players number then punched them out with a 1" circle punch.


I put a dab of hot glue inside the bottle cap then firmly pressed the 1" insert inside.  Make sure to press all around the inserted piece to spread the glue around.


Once they are all glued into the bottle caps, let them dry for a minute then put one of the clear dome stickers over top.  This protects the insert and makes it "pop" just a little bit.  You can also have a helper do this for you.


Can you see the difference?  The one of the left has the clear dome sticker over it and the one of the right doesn't .


My helper!


I then had hubby drill holes into the sides of all the bottle caps.


I went to Hobby Lobby and got some 6mm round jump rings that would be put through the hole that hubby drilled.  After putting the rings on and making sure they were secure, I cut my ribbon to 25" long.  I wanted the necklace to be long enough for anyone to slip it over their heads.  I didn't have the time or funds to add a clasp to each one.  After putting the ribbon through the jump ring and knotting it off at the end, they were ready to go.


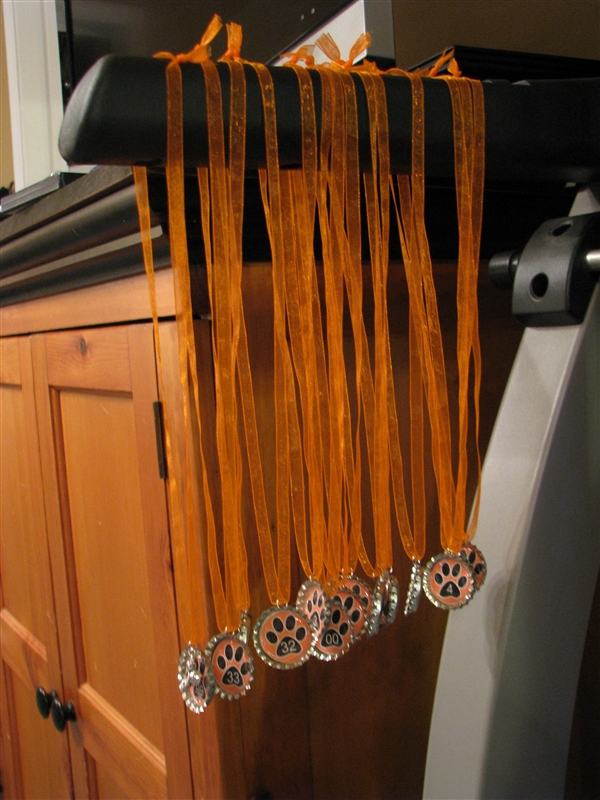
This is what I ended up with.


I added a little something extra to my sons.


I put them all in individual baggies to hand out to the moms at the game.

I hope they will be able to wear them again and again.


I don't believe I did too bad at my first attempt at jewelry making.


I will be linking up with these parties..... 

Wednesday, June 13, 2012

Game room turned library

I have been finished our basement for awhile now.
I have been taping, sanding, priming and painting one area at a time.

It takes longer, but it makes me feel like I have accomplished something.

We (I) use our basement frequently so I have wanted to continue to use it while I'm doing all the finish work.

The latest area I have finished is one of the very back rooms.  This room was once my office then I moved my office into a bigger room with my craft/sewing/scrapbook room.

Several years ago my kids got an air hockey and foosball table for Christmas.  They are not large tables thank goodness; but they are big enough to take up lots of space.  My kids rarely ever use them so I thought that maybe if I made them a room, like a game room; that they would go down there and play.

Nope.

Not happening.

They game tables ended up being spaces where I would put things that I was wanting to work on but hadn't gotten to yet.

No air hockey going on on these tables.


Having the chairs in there from my old dining table doesn't help much either.

My point is; the kids aren't using these tables so I think it's time for them to go to the garage sale or goodwill but hubby won't hear of it.  

Well since having a game room didn't work, I decided to turn that room into something a little more fun.  A library (sorta).

I know that doesn't sound like fun to some people but sounds great to me.

I moved both the air hockey table and the foosball table into the first room of the basement, which hasn't been finished yet; and moved all my books and the couple dressers they were sitting on into the back room.  I also figured once we start finishing the first room in the basement, it will be easier to work around the game tables than the books and dressers.


The white dresser is a small dresser with a hutch.  Perfect for storing books on.  Of course, we also have the big brown book shelf which is full and the VHS stand turned book shelf.


The chest of drawers had the brown book shelf on top of it but I didn't want it like that in here.  I also added a comfy chair for anyone who would like to disappear down here and do a little reading.


I still need to add a couple pieces of artwork to the walls (and finish the floors and ceiling) but for now, I love how it turned out.

This room is directly attached to my office/craft room and it makes  me so happy to be down there now than when the game tables were in there collecting unfinished projects.


I now have a place to put some of my carousel figurines.


My youngest son and I have used the spot as a quiet little reading nook but we haven't gotten the rest of the family on board.  Oh well, more reading time for us right???


I'm linking up to these parties... 

Sunday, June 10, 2012

Living Room Completion


My living room is finally complete.  It didn't take nearly as long as I had thought it would and I love how it turned out.

Let me just remind you what the living room looked like before:


I loved the dark brown and maroon paint when I first did it.  Over time, the room just seemed so dark.  We don't have a ceiling light of any kind in this room and the lamps just weren't enough light for the room.

We then removed all the carpet and put down hardwood flooring.


I had originally wanted to do board and batten in this room, but realized that it would take forever and be costly so I decided against it.

What I did decide to do was paint the room and make some curtains.  

You can read about the progress here and here.

I love how it turned out.
I love how the room seems so much brighter and bigger now.


It's amazing to me what lightening up the walls will do for a room.


I also made some curtains.

They are light and airy and let in natural light, which I think is very important in any room.


So this is the room with all the pictures back on the walls and furniture in place.


Lets look at the progress:

Before

and after....


I'm very happy with it.

I'm also happy to be able to mark that room off our list of DIY home plans 2012.

Now onto our next project!


I'm sharing this post with these great linky parties...... 

Friday, June 8, 2012

Purse organizing love

I normally consider myself a pretty organized person.
I've always thought that I was more organized than my immediate family.
I've thought I was more organized than my friends and especially my hubby.

It comes natural to me that you should keep your papers in labeled file folders and that you should use page protectors in your binders.

I've always been a calendar lover and user. I currently have 3 calendars that I keep up with.  They all have the same information but I just can't seem to only go with one.

I recently purchased a new purse.

This purse to be exact.

 I love the purse.  I love the design of the fabric and I love that it was able to be monogrammed with my initial.

I was looking for a purse that would be big enough for me to carry around my business catalogs and flyers with me so when someone asked what I do, I could hand them a flyer so they could see exactly what I do.

To be honest, I wish the purse was a little bigger.

It has a big bottom, no pun intended; which makes it extremely roomy.


It also makes it sit up, which I love.

What I don't love about the big bottom is everything inside gets piled on top of each other.


Nothing is lined up and organized like I think it should be.  It takes me forever to dig through everything to get to the one thing I want that has fallen all the way to the bottom.

And so I was frustrated.  
I was frustrated that I felt like I couldn't keep catalogs with me and I was frustrated that every time I went to get something, I couldn't find it or get to it.

I was sharing my frustrations with a couple girlfriends the other night and one of them whipped out her purse to show me her organizing techniques.  She is also in direct sales and carries catalogs with her at all times.

Her solution is to put a file folder in her purse.  She tapes up the sides so it's like a little pocket.  I loved the idea and since our catalogs are the same size, knew it would work for me.

She even gave me one of her file folders.


She taped the sides with scotch tape but once I got home, I added packing tape to it so it would hold a little better.


My catalogs and flyers fit perfectly.


   Now I can have them with me at all times.

The file folder slips right down into the middle of the purse and makes a divider so I can keep different things on either side.


I can put my wallet and checkbook on one side.


With my pens, notepad and any miscellaneous things on the other side.


My girlfriend also had lots of little bags in her purse, which I will have to work on getting.

Just for the record, this is everything that had been thrown into the purse before.


I'm not sure I even knew all this stuff was in there.

Since I was organizing, I also took the opportunity to clean up a little.

All of this stuff didn't go back in.

I love the way it looks now, so clean and organized.

Do you have trouble keeping your purse organized?  Does it seem like a never-ending pit of stuff?  Mine doesn't anymore and I am very thankful for that.


I'm linking up with these parties....... 

LinkWithin

Related Posts Plugin for WordPress, Blogger...